![]()
![]()
![]()
![]()
“’Tis the gift to be simple, ’tis the gift to be free
’Tis the gift to come down where we ought to be,
And when we find ourselves in the place just right,
’Twill be in the valley of love and delight.
When true simplicity is gained,
To bow and to bend we shan’t be ashamed,
To turn, turn will be our delight,
Till by turning, turning we come ’round right”
– Shaker tune, “Simple Gifts”
Do you have a home project sitting on the shelf of your mind, collecting dust and waiting for the right moment to transition from idea to real-life thing? I have several. Fortunately for me, second trimester has drug a few of them off of that shelf in the name of nesting! One of those is our entryway storage, and a simple but useful transformation that will add not only beauty but bushels more storage for our growing family of…six! I love saying that.
As you well know, I love our old home. Alas, some of the drawbacks of these dear old gals, Saltbox Colonials in particular, is that they were not built with the kind of storage we in today’s age might be used to. We do not have a coat closet, or any closet for that matter, on the main level of our home. While we do have a wonderful Shaker pantry that is put to good use, it would be rather swell to have a place to keep things like coats and shoes and ugly contraptions like the vacuum. Because we use these things everyday, they tend to sit out and drive me mad, until I get so fed up tripping over the cord that I shove it in the garage until I need it several hours later.
But this post is not about vacuums and is about our entryway so let me get back to it. The previous owners of this home did a wonderful transformation, adding wanscot paneling complete with several hooks to the entry walls that before it, were indeed naked. They did it themselves, and they did it beautifully. That being said, the silver hooks were never really my style, and I had always planned on replacing them with forged iron ones at one point or another. I also always wished that there were more hooks to hang things like hats and baskets, and just made do piling what we had on top of one another until we got though the thick of winter.
Then about a couple years ago I saw exactly what I wanted to do with our entry in a rented book about Shaker design from the library. I wanted to add pegs, lots and lots of pegs, to the already existing molding, to create a look that was already in our home while adding much more organizational storage as we entered our home. The only problems were:
A). Motivation (see dusty idea shelf above)
B). How does one get pegs into already exiting molding without ruining the whole thing?
C). Knowing full well that the whole shebang would need a fresh coat of paint, and well, see A.
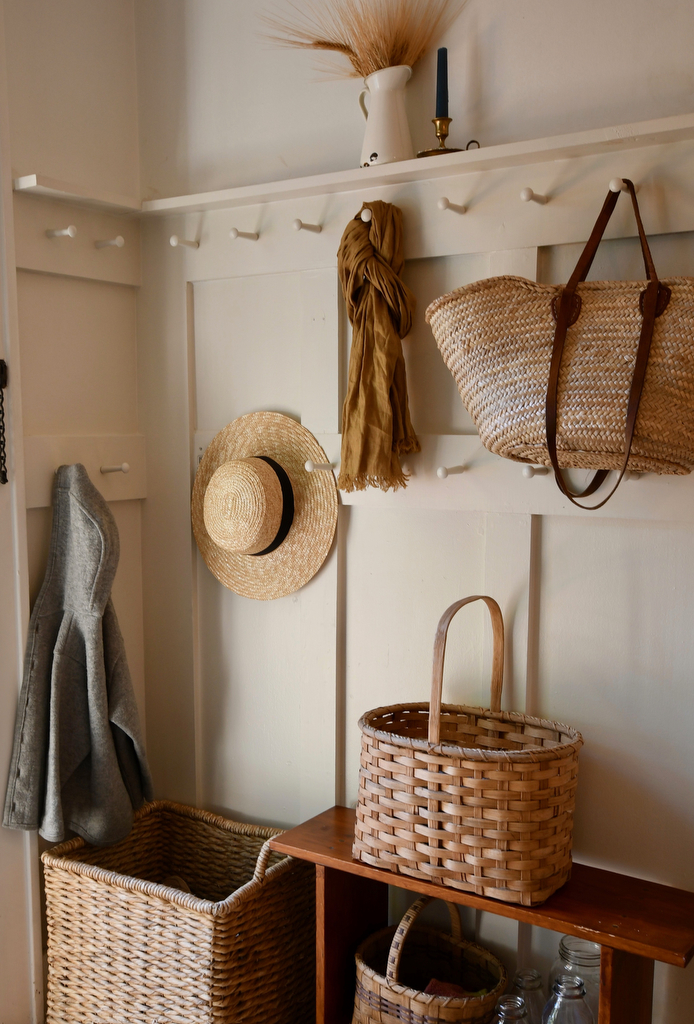
But as I’ve mentioned before, nesting has taken care of both A and C, leaving me to sort out B, which I have! Did you know there are such a thing as screw pegs? Yes, indeed. You can purchase pegs with screws on the end so that you do not need a special drill bit to make a hole to fit a peg. How marvelous! This is precisely what I did. Here is a step-by-step tutorial of how I transformed our hook entry to a Shaker peg one, along with paint colors used and how I ended up creating a system for bottles, hats, scarves, gloves, and shoes.
before…
Screw-In Shaker Peg Rail Tutorial
Step One: Measure | Using a tape measure and pencil, measure out how many pegs you will need creating spaces and marking on the rail itself. I opted for a 6″ space between the pegs, following the existing peg rail in our itty bitty mud room. With 6″ between each peg, I measured 32 pegs in all would be used.
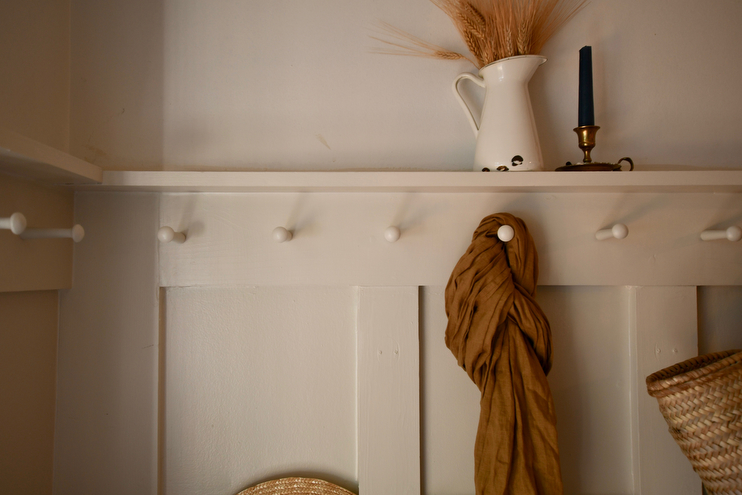
Step Two: Buy | After doing a bit of research, I decided to purchase these pegs off of Amazon, ordering the 3 1/2 long x 1/2 inch size. They had great reviews, and I like the size compared to shorter ones found on other sites. I then ordered paint, deciding on Farrow and Ball’s School House White, a close cousin to the creamy ivory currently found in our kitchen. I liked that it added a pinch of contrast to the walls that are Sherwin Williams Extra White, but not too much that it darkens up our home. (Ps. the hooks have an affiliate link!)
Step Three: Replace | Next I took out all the silver hooks, sanded the molding, and replaced them with the wood pegs, screwing each one in my hand. While it did take a little bit of elbow grease, it wasn’t too hard to accomplish. I made sure to get the spacing right, and not screw them in all the way before painting.
This photo shows me testing paint colors and the wainscotting without a sand.
Step Four: Paint | Once all the pegs were in place with about 1/2 a centimeter between the peg and the wood panel, I painted all of the wainscoting. I could had just done the trim, but because I loved the color so much I decided to do the whole thing, giving it a nice refresh. I still need to give the wall above the molding a face lift with some Extra White, but you can tell how lovely the subtle contrast is already. I used a craft paint brush for the pegs given their size and a larger brush for the walls.
A tiny paintbrush for tiny pegs.
Step Five: Final Screw-In | I left this step to my better half who is far stronger than I. He finished the job by screwing in all the pegs nice and tight!
This was taken just before the final screw-in. The pegs are indeed a bit bendy until fully screwed in, which is why they are not straight here!
Step Six: Organize | The last and final step was a fun yet essential one, whereabout I created a system to organize all our odds and ends. There is one large basket at the base of the pegs for shoes (Target), one medium sized basket on a small Shaker bench (thrifted) for hats and scarves (thrifted), and one small basket underneath that same bench for gloves (thrifted). There is a space next to this basket for bottles that need to be returned, a small sisal rug to catch mud and the like upon entry (Ikea), and a boot tray on the opposite side behind the door for rain and snow boots (Ikea). The hooks are then left for baskets, coats, hats, backpacks, and anything else I want to get off the floor!
You cannot beat a well-made basket from the thrift store. This one was $3.
![]()
![]()
![]()
There you have it! A simple but handy transformation that cost very little but adds a lot of value and beauty to our home. I have several more home nesting projects up my sleeve, any guesses on what they are? As always, happy homemaking! xx Amanda
melissa - great tip about the screw-in pegs! it looks lovely and very useful.
admin - Melissa, thank you! They proved to be much easier than drilling etc. Saved me some time for sure! xx Amanda
Leslie - Lovely!
admin - Leslie, why thank you! xx Amanda
Jordan Graves - I love this so much! I’ve been waiting on Instagram for a finished shot. You’ve inspired me to do a similar thing in my entry way (I’ve only got a little walk where we have created an entry, but I think it would work!). Now off to find a bench 😊
admin - Jordan, lovely! It’s such a small do-able DIY but makes such a big difference when you’re lacking organizational space! xx Amanda
emily christine - Since I know it’s not easy putting your life on display to build this community, I want to thank you for sharing in a genuine and gracious way. As a single woman just a couple years younger than you (with a demanding job and no littles prompting me to cook and clean like clockwork), homemaking doesn’t always get the time it deserves, though it’s still so important and life-giving. You encourage me to keep cultivating my home, and not only that, but your photos, words, and smiling faces give all of us a sense of season and home even across this digital space.
I hope you know your investment goes well beyond your four walls, and I’m so glad to have connected years ago to share the journey.
admin - Emily, thank you for taking the time and energy to share such heartfelt words here. I want you to know how much this community means to me, and you expressing such sentiments truly uplifts my spirit and helps me further see how valued the work is I share. The internet can indeed be a place of anger, judgement, and sadness, but more than that, it is a place that can inspire, encourage, and love. You’ve shown me this today, thank you. xx Amanda
Laura - Really well executed ideas!! Congrats on six!! It was one of my favorite times in my life after my sixth: everyone still home; older kids able to help: and I was still in my 30s. God bless you.
admin - Laura, thank you my dear! It’s also always appreciated to hear perspective from mother’s who’ve walked this path before. It warms my heart and offers me grace. Sending you love today! xx Amanda
Mudroom Plans for the Fischer Flip - Naomi Bjerk - […] Homesong Blog […]
Megan - Love this so much! What color paint did you use – it’s perfect!
Aleksandar Tomov - Hi
Do you currently offer advertising on homesongblog that blends nicely with your normal content? If so, can I show you what I had in mind?
Regards,
Aleksandar
Hannah Rozsa - Absolutely love this! Do you have any idea how much weight those little pegs can hold? Would love to do something like this in our new home. 🙂
Julie P - Hello! I love this! It is my favorite peg rail shelf on the internet. 🙂 Quesrion. How high did you end up hanging it? I know if it was a peg rail only, it is higher….but with the shelf, what did you decide on? Thank you so much!
Shaker Influences and Camp Style Decorating: Friday Finds #106 | Town & Country Living - […] loving this easy Shaker style peg board idea from Homesong. What a great solution for adding a little bit of storage to any […]
Style Scouting: Vol. 115 - In My Own Style - […] I had a space to do this, I […]
Why Do Old Houses Have Tiny Closets? A Quick History - Everyday Old House - […] Courtesy of Homesong […]