![]()
![]()
![]()
![]()
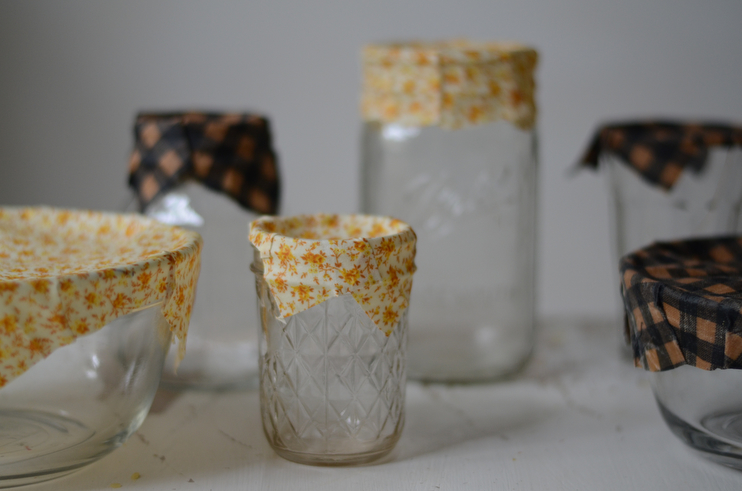
Several posts ago I wrote about some zero-waste practices we have been recently implementing at home. Trying to recuse the amount of trash we produce as a family is important to us, and every little bit helps. I shared some beeswax food covers I have purchased, and how we have been using them in lieu of plastic wrap. They work well, but because my mind is always churning around ideas to the tune of, “I bet I could make that!” I tried to craft my own. It was quite simple and to my surprise, they work wonderfully! I also loved the fact that I got to chose the fabric, because beauty is important, too. I settled on two of my current favorites: a goldenrod flower + classic neutral gingham.I made several different sizes to cover jars, bowls, and other glass containers, and will be making more for larger storage, like pies and casseroles. Here is how you craft them:
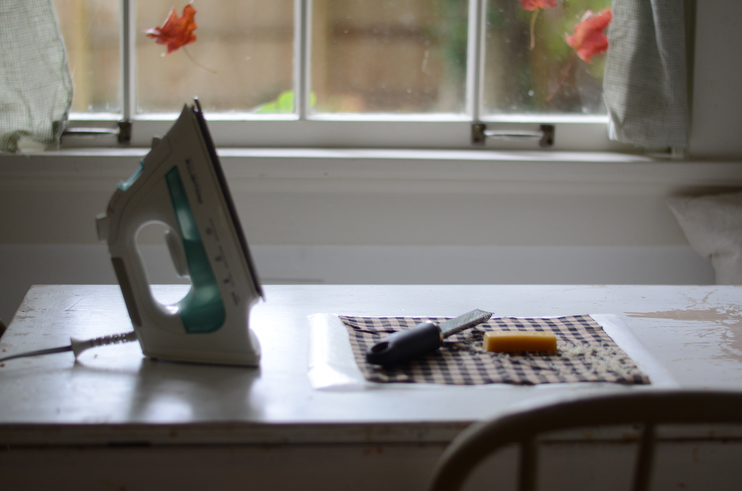
Step 1: Gather your materials. You’ll need the following:
- cotton fabric
- beeswax, either pellets or a block to grate
- waxed paper
- hot iron
- *micrograter if you use beeswax in block form
![]()
![]()
Step 2: Cut your selected fabric into whatever sizes you like. I made some to cover various bowls etc. so you can customize this for your needs.
Step 3: Place the cut fabric on top of a sheet of waxed paper. You may need to double up depending on the size of your fabric.
Step 4: Grate beeswax rather liberally on top of the fabric, covering every inch. Do not make one big mound in the center, but cover the entire piece with the same amount of shaved wax. If you choose beeswax pellets for this project, spread them out evenly making an even layer.
![]()
![]()
![]()
Step 5: Cover your beeswax-covered fabric with another sheet of waxed paper.
![]()
![]()
![]()
Step 6: Gently iron the fabric running it on top of the waxed paper, melting the beeswax beneath. You will notice the color of your fabric darkening and becoming more saturated as you run the iron over it, this means it’s absorbing the wax, hooray! Once you can no longer see the pellets, and every inch of fabric has turned darker, you’re done. Peel off the top layer of waxed paper and set fabric aside to dry. You can use as soon as it cools.
![]()
![]()
![]()
![]()
![]()
![]()
![]()
![]()
![]()
*To clean | Hand scrub with mild soap (such as Dr. Bronner’s) and COLD water. Hot water will melt the wax and you’ll have a mess on your hands.
And there you have it! A simple, natural, eco-friendly way to preserve your leftovers that doesn’t rely on plastic wrap. I think this craft would make a lovely housewarming gift for a friend, or perhaps a nice handmade Christmas gift idea.
Charlotte - I love this idea! Does the beeswax make it cling to a bowl similarly to cling wrap, thus making it airtight? These are darling!
admin - Charlotte, yes! When you press the wax together around the jar or bowl, it seals with the warmth of your hands and creates a lid, so to speak! The wax then hardens in the fridge, making it even tighter, and unfolds very easily. x Amanda
Charlotte - Excellent! Sorry, I have one more question. Do you wipe these clean or rinse them? Just curious. I think these would make darling gifts for Christmas & I’m always looking for homemade gift ideas!
Morgan - Thank you! My hubby ruined one of mine 🤦 and I was thinking I had to go buy more. This is a great option! Do you think I could use parchment instead? I don’t use wax paper.
Anna - I am wondering the same thing about parchment :). Wax paper confuses me a bit. Does it melt when you iron it?
admin - Anna, the wax paper (parchment) is able to withstand heat, so it will not melt. I get how it’s confusing though, as we are melting wax under wax, ha! x Amanda
Aubrie - I love this idea, thank you for sharing! I will be trying it soon! I was wondering where you buy your beeswax and if you have a recommendation for a certain brand? I’m also in the Kansas City area so I could buy local as well. 😊
admin - Aubrie, I currently get mine from Rose Mountain Herbs online 🙂 x Amanda
Carolyn - It looks like you cut yours in squares – is this correct? Any particular reason why? If you are planning on using on certain bowls you could also cut in circles, right? Or am I missing something? I love this idea. Adorable!
admin - Carolyn, I did both circles and squares! I recommend making squares then cutting them after they dry with the wax. x Amanda
Alison Ness - Love this! I’ve been meaning to try this project for so long but all the instructions I kept finding seemed so messy – this seems so doable and tidy! I’m trying it this afternoon!
Ashley - This is great, Amanda! I have been wanting to purchase beeswax wraps for some time now, but have been hesitate because 1. I wasn’t sure how well they worked and 2. cost. But this looks like a simple enough craft that I would love to try on my own. And making them out of fabric that you like best is a huge bonus!
J - How neat! I can’t wait to try these! I got really excited thinking I already had everything to make them, but I think I have craft grade beeswax and I’m betting this would probably be better with foodgrade. I think I’ll try cutting the fabric with pinking shears so it doesn’t fray, and because I just love a cute pinked edge. Thanks for the tutorial! 🙂
Jennifer - How do you recommend storing these? Also, how many uses do you get out of one?
Sarah - These are so sweet! How would you store them?
Jess - Do you put the beeswax on the backside of the fabric, or the top, or does it not matter because both sides get saturated? Thanks!
admin - Jess, I put the beeswax on top of the fabric, but either is fine as it will should soak through completely! x Amanda
Sabrina - Vraiment utile, merci!
Maggie - I attempted to make some of these tonight as a gift and for myself and think I must have done something wrong… followed all of the directions, but somehow I have melted wet something on my iron, a mess of wax on the ironing board (somehow through the paper..?) and it isn’t holding on the fabric like it should.. any idea how I messed up so badly??
ling - I’m planning on making some for Christmas. Can you wash these wraps for reuse? How do you propose to clean them after use please?
Morgan - Yes these are washable! Just be certain to use cool water when cleaning and a mild detergent otherwise you will melt the wax. Hope this helps 🙂
Amy Beck - I was also wondering how you store these! Folded? Flat?
Gwen - Hi, I love this idea and am interested in making some for my home. However, I’m trying to avoid using bee products as the bee industry is not as ethical as I would like. Will other wax alternatives work the same for a product like this?
Sara - This is wonderful!! I’m making this today, and THANK YOU! I’ve been looking for a good tutorial! I LOVE LOVE your blog and home! You have totally inspired me! <3
–Sara
Handmade Holiday | A Gift the Keeps On Giving: Mason Jar Planted Paperwhites » Homesong - […] handmade gifts are you giving out this year? I am going to also make some festive beeswax food covers and homemade hand body lotion this week with essential oils as well. Here are several more ideas […]
Julie Spangler - Does the waxed paper stick to your iron? Do you use an old iron for this purpose?
admin - Julie, I found that it doesn’t, but I am wondering if there is an alternative you could try? Hmm. xx Amanda
Julie Spangler - I used parchment, and after making several of these I found the beeswax did end up on the iron, either from getting too close to the edge, or stray wax finding it. Regardless, it was a super fun project and they turned out beautifully! I found that using less wax made a thinner, more pliant cover.
Thank you again for the tutorial!
These are terricic gifts this holiday!
https://www.facebook.com/ - The ONE thing ALL great speakers have in frequent.
Virginia Fiol - I want to make them this summer.
Do you still use it?
After more than 2 years, are they good as new?
🌸