![]()
![]()
![]()
![]()
We are in the middle of a pretty intense heat wave over here in the Midwest, and boy is ever it hot hot hot. The humidity level reached the point of unbearable since this past week and that means our outdoor adventuring has sort of come to a halt until things cool off a bit. That being said, this fry-an-egg-on-the-sidewalk weather is perfect for sun printing! Lemons out of lemonade, right?
Have you ever done sun printing with fabric before? The kids and I love sun printing on paper, but incorporating linens into this craft takes it to a whole other level of homemade beauty. We have some really lovely leaves growing in our backyard and garden right now and I’ve been itching to do something clever with them. After dabbling a bit in natural dyeing online and from some books I got from the library, I happened on something I’d never heard of before: Inkodye by Lumi. It’s a UV activated fabric dye that when exposed to sunlight, produces a negative of the shadow of whatever object you’ve placed on top. I did a bit of research into this product and found out that it is very low in toxicity and and fairly simple to do! It’s a wonderful way to add botanical beauty to your home in a variety of ways, whether it be pillow cases, napkins, or wall tapestries. Here’s a step by step for you, but keep in mind that there are many variables that can affect the outcome of this craft, so it’s best to keep an open mind when going in and let the sun do it’s thing!
Materials:
- White linens – opt for more natural fibers like wool, linen, and organic cotton to get the best results
- Solar Dye – I used the Inkodye in Sepia hue for this and diluted the dye for lighter colors
- Large basin – for dipping and dyeing
- Large basin – for rinsing the dye
- Paint brush
- Water – tap if fine, but can affect results depending on hardness of your water
- Flat, moveable surface – cardboard or a lid of a bin work well
- Leaves and flowers – or anything else you want to print wit
- Acrylic board – optional but nice to have on hand if you’re printing on a windy day
![]()
![]()
Step 1: Gather your printing materials in a dark or dimly lit space out of direct sunlight. This step is very important because as soon as the dye and sun connect, your fabric will start to change color. I did this step in our dim dining area, but took the photos for you in the kitchen so you could see the process. Ideally, a dark room is best.
![]()
![]()
![]()
![]()
![]()
![]()
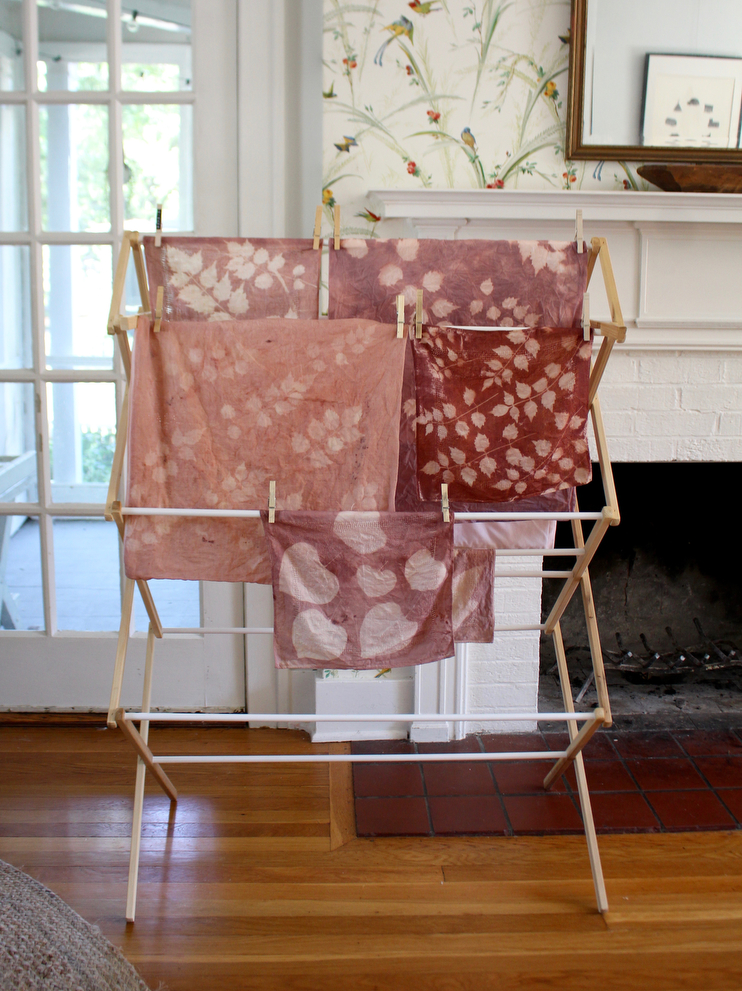
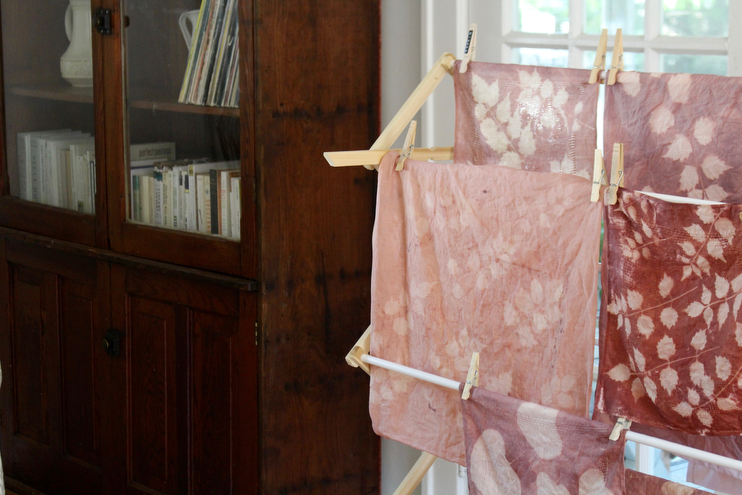
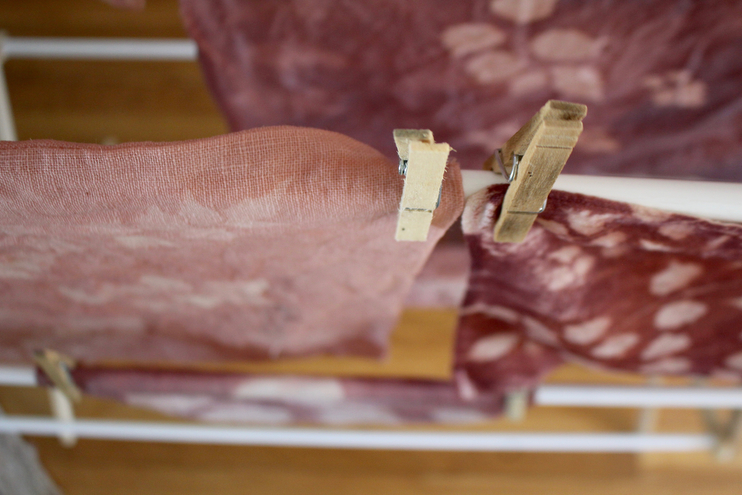
Step 2: You can go one of two ways for this step. For items you want to be very saturated with color (i.e. see the darkest, small linen napkin 0n my drying rack) you’ll want to apply the dye with a paintbrush. Just pour a bit in a jar like you would a glass of chilled rose, and go from there. I chose Sepia because I wanted a brown-pink color, but Inkodye has many to choose from. Lay out your fabric on a flat, moveable surface, and paint it on as if you were painting every square inch of a canvas. For items you are wanting a lighter more muted sun print, you’ll need a large basin for dip dyeing. This is where things can get a bit experimental. After painting one linen cloth with the dye, I poured the rest of the bottle in a large enamel basin. I then added four cups of tap water in basin to dilute the dye mixture, and tossed in the rest of my linens which are the ones you see above. I then swirled everything around a bit, making sure that each linen absorbed the dye mixture, and then one at a time, repeated Step 1 after ringing out as much dye water as possible in the basin from which I took it from. Like any dilutions, the more water you add, the less concentrated your mixture will be. You should know that the kind of fabric you choose will affect the intensity of the print and color. Opt for more natural fibers like wool, linen, and organic cotton.
![]()
![]()
![]()
Step 3: This is where your creativity comes in! While still in a dark room, arrange whatever bits of nature you collected on top of your freshly brush or dip-dyed linen. I did one at a time because of the size of my board, but you can do as many as you have room for. I found that the smaller, more detailed leaves, made the most beautiful designs. If you are looking for a clear-cut design, you may think about putting a clear acrylic board on top to keep the leaves and flowers flat, but if you are okay with a more organic, imperfect design, there’s really no need. When you have your desired design laid out, you’re ready to head outside in the sunshine.
![]()
![]()
![]()
Step 4: Pick up your board and move it to the sunniest spot in your yard, garden, or patio. The length of time you leave your fabric in the sun will affect the intensity of the print and color. I would leave it in full sun for at least ten minutes to achieve a crisp design, but shorter or longer is fine too. There’s no rule book for this craft, so have fun!
![]()
![]()
![]()
Step 5: Bring your linen(s) inside, preferably back to the same dark room you started in, and remove the leaves, stems, and flowers. Give the dyed linen a dip and scrub in clean water, and then ring it out well before hanging to dry. By ringing it out, you are removing all the dye that was under the leaves thus creating a more clear design. I recommend you use clean water for each linen, but do as you want. For drying I used our drying rack, but you could easily lay your dyed linens on an old towel or newspapers too. It’s important to know that even though the linens are out of direct sunshine, they are still processing! If you dry them in any kind of sunlight or UV rays, they will change immensely. Keep them in the dark until dry, preferably overnight. Once dry, you can then wash your linens with a mild detergent on a gentle cycle before hanging to dry. I used 1/2 a scoop of my homemade laundry soap, and did not dry them in the dryer to prevent from shrinking.
![]()
![]()
![]()
As I mentioned before, there are many variables to this process, specifically the kind of linen you choose, the dilution of the dye, and the length of time you leave your print in the sunshine. That being said, this craft is a wonderful one to do with kids because they can have a fun arranging things they’ve found on nature walks or on scavenger hunts in the garden. I have some green dye ordered and plan on making some dyed kitchen aprons with the kids as gifts for loved ones using different kinds of fruits and vegetables. I’ll share that here once we’ve finished it later on this summer! If you want to read up on the creator of this kind of dye, this Economist article is a good one. And if you do some sun printing on linens this season circle back to let me know how they turned out!
*I have just read that Inkodye has closed shop, but you can still find many of their products online. The next best solar dye for fabrics is Jacquard SolarFast, and they produce a wide-range of colors as well. I have not used this specific brand personally, but the reviews are rather good.
Keri Clark - Love this idea! Will try soon. Can’t wait to see the fruit aprons!
Mason - These towels are so lovely! Do you have a good source for buying them?
Mason - These towels are so lovely! Do you have a good source for buying the undyed towels?
Mary - These are beautiful! I didn’t know you could do other sun print colors besides the standard dark blue, but these are so lovely. Thanks for sharing! I will definitely try this with some white fabric and children’s t-shirt I have stashed in my sewing box.
samirah Mujahid - I love every thing.
Sun-printing fabric with leaves - explorations in sun-dyeing - Pumora - all about hand embroidery - […] Botanical Sun Printing on Linens by Homesong […]
Cheri - Awesome can’t wait to try!